

Your bike has no power, the battery will not charge, or your range has suddenly plummeted. You might fear a total battery failure, but many common battery issues have simple fixes. Your problem could be as straightforward as a loose connection or a dirty charging port. These troubleshooting tips can help you diagnose your electric bike battery.
请注意: Often, the fix is simpler than you think. You can try these simple solutions:
- Inspect connectors for any corrosion.
- Reset the Battery Management System (BMS) if possible.
- Store the battery indoors during cold weather.
Visual Inspection: Your First Check

Begin your diagnosis with a simple visual check. These initial troubleshooting tips often reveal the problem without needing any special tools. You should always power down your bike and remove the battery before starting any inspection.
Inspect for Physical Damage and Swelling
Carefully look over your electric bike battery case. You are searching for any clear signs of damage. Pay close attention to these indicators:
- Cracks in the plastic casing
- Dents from a drop or impact
- Signs of water entry or corrosion
- Swelling or puffiness of the battery case
⚠️ Safety Alert: Swollen Battery A swollen battery is a serious hazard. Swelling happens when gases build up inside, often from damage or age. This creates a significant fire risk. Do not charge or use a swollen battery. You should replace it immediately.
Check for Loose or Dirty Connectors
Next, examine the metal contact points on both the battery and the bike’s frame. Dirty or corroded terminals can block the flow of electricity. If you see white or green buildup, you need to clean the contacts.
- Use a soft, dry brush to remove any loose dirt.
- Wipe the contacts with a cloth dampened with isopropyl alcohol (70% or higher).
- For stubborn corrosion, use a specialized contact cleaner and a soft brush.
- After cleaning, apply a thin layer of dielectric grease to protect the terminals.
Ensure the Battery is Seated Firmly
Your battery must connect securely to the bike’s mount. A loose connection can cause intermittent power cuts, especially when you ride over bumps. Wiggle the battery gently in its housing. It should not move or rattle. If it feels loose, check the locking mechanism. A click or snap usually confirms it is seated correctly. An unsecured battery can cause the display to flicker or shut off unexpectedly.
Check the Battery Fuse for Failure
Many e-bike batteries have a fuse to protect against power surges. A blown fuse will prevent the battery from delivering power. The fuse is often located inside the battery case 或 in an external holder on the power wire. Check your bike’s manual to find its exact location. If the thin wire inside the fuse is broken, it has blown. You will need to replace it with a new fuse of the same amperage rating.
Diagnosing Your Electric Bike Battery Charger
Sometimes the problem is not the battery but the charger itself. These troubleshooting tips help you determine if your charger is the culprit. First, test the charger independently to see if it receives power from the wall.
Verify the Charger’s Power Light
Unplug your charger from both the wall and your bike. Now, plug the charger directly into a working wall outlet. Most chargers have a power indicator light.
Charger Power Check: A solid green light usually means the charger has power and is ready. If the light does not turn on, try a different outlet. If it still does not light up, your charger has likely failed and needs replacement.
Observe Charging Indicator Lights
After confirming the charger gets power, it is time to connect it to your electric bike battery. Pay close attention to how the indicator light changes. The light’s behavior tells you what is happening.
| Light Status | Common Meaning | What It Tells You |
|---|---|---|
| Solid Red | Charging in Progress | The charger is successfully sending power to the battery. |
| Solid Green | Charging Complete | The battery is fully charged. |
| Flashing Light | Potential Fault | This could signal a battery fault, a connection issue, or a charger error. |
If the light stays green when connected to a depleted battery, it means power is not transferring. This often points to a dirty or damaged connection.
Clean the Charger Port and Plug
A poor connection is a common cause of charging failure. Dirt, dust, or corrosion can block electricity. Safely cleaning the charger plug and the battery’s charging port can solve the issue.
To clean your connections safely:
- Use a can of compressed air to blow out any loose dust and debris from the port.
- Gently wipe the metal contacts on the plug and port with a dry Q-tip or soft cloth.
- For stubborn grime inside the small pinholes, carefully use a non-conductive plastic or wooden toothpick.
- Never use metal tools like paperclips or screwdrivers to clean the port, as this can cause a short circuit. Also, avoid using spray-on contact cleaners like GT85.
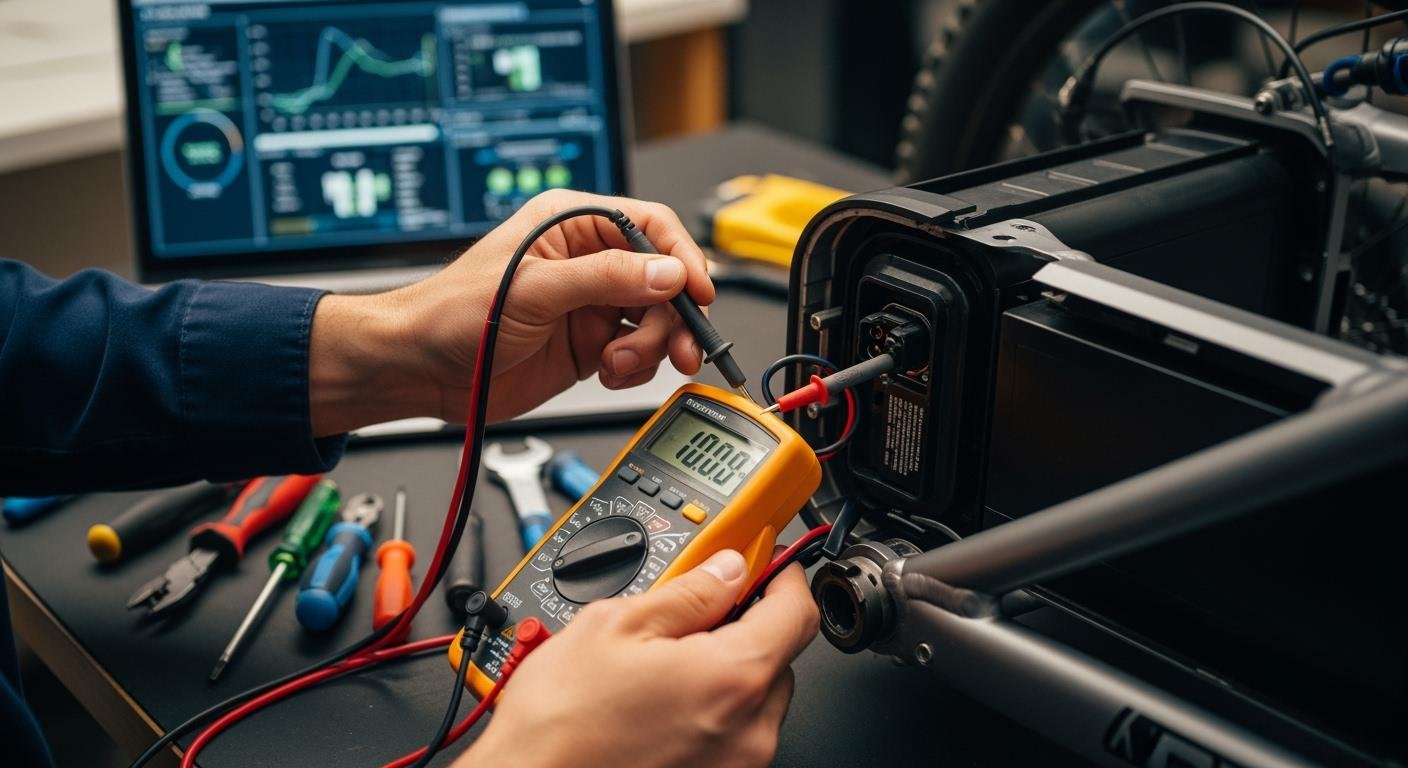
Multimeter Test for Definitive Answers

Visual checks and charger tests can solve many issues. When they do not, a multimeter provides a definitive voltage reading. These troubleshooting tips will help you get a clear answer about your battery’s health.
Prepare for a Safe Voltage Test
Safety is your top priority when working with an electric bike battery. A mistake can damage the battery or cause injury. You must take proper precautions before you begin.
⚠️ Safety First: Risk of Short Circuit Never let the metal multimeter probes touch each other while they are connected to the battery terminals. This can create a short circuit, causing sparks, damaging the battery’s internal cells, and creating a fire hazard. Always wear safety gloves and work in a clean, dry area.
First, remove the battery from your bike. Place it on a stable, non-conductive surface like a wooden table.
How to Measure Battery Voltage
A multimeter measures the electrical potential, or voltage, of your battery. This reading tells you its current state of charge.
- Set Up Your Multimeter: Turn the dial on your multimeter to the DC voltage setting. This is usually marked with a
Vfollowed by a straight line and a dashed line (⎓). Set the range higher than your battery’s nominal voltage. For example, use the 200V setting for a 36V or 48V battery. - Connect the Probes: Carefully touch the red (positive) probe to the battery’s positive (+) terminal. At the same time, touch the black (negative) probe to the negative (-) terminal.
- Read the Voltage: The multimeter screen will display the battery’s exact voltage. Hold the probes steady for a clear reading.
Interpret the Voltage Reading
Your battery’s voltage reading tells a story. You must compare it to its expected voltage range. A fully charged battery will always show a voltage higher than its printed nominal voltage. An empty battery’s voltage will be higher than zero.
For example, here are the typical voltage ranges for a 36V battery:
| 额定电压 | 完全充电电压 | Cutoff Voltage (Empty) |
|---|---|---|
| 36V | 41.5V – 42V | ~30V |
If your fully charged 36V battery reads 42V, it is healthy. If it reads 35V, it is not holding a charge. A reading near or below the cutoff voltage means the battery is deeply discharged and may be damaged.
Identifying Common Electric Bike Battery Issues
Sometimes, an electric bike battery passes a voltage test but still performs poorly. These next steps help you identify common electric bike battery issues by observing how the battery behaves under real-world stress. This process can reveal problems that a simple multimeter test might miss.
Test Performance Under Load
A real-world ride is the best way to test battery performance. Fully charge your battery and find a steep hill for your test.
- Ride up the hill using a high level of pedal assist or the throttle.
- Pay attention to how the bike feels.
- Does the power cut out completely and then return after a moment?
A sudden power loss, especially when climbing, points to weak cells. The battery’s 内阻 increases as it ages. This causes a large voltage drop, or “voltage sag,” when you demand a lot of power. If the voltage drops too much, the bike’s controller cuts power to protect the battery.
Monitor the Display for Erratic Jumps
Your bike’s display offers valuable clues. While riding, watch the battery level indicator. A healthy battery shows a smooth, gradual decline in charge. One of the most common electric bike battery issues is a display that shows erratic power levels.
What to Look For: If your battery display drops from 80% to 30% when you accelerate and then jumps back up when you coast, it signals a problem. A voltage sag of more than 6 volts under load indicates a battery with high internal resistance that is likely nearing the end of its life.
Assess Drastic Range Reduction
Has your maximum range suddenly dropped? A significant decrease in how far you can travel on a full charge is a classic sign of battery degradation. To confirm this, you can perform a range test. Charge your battery completely and ride your typical route until the power cuts off. Comparing this distance to your bike’s original range will show you how much capacity has been lost. This is a clear indicator of a potential battery failure.
Isolating Other Potential Battery Issues
Sometimes, other components can mimic battery issues. Before you decide to replace your battery, consider these other possibilities:
- Faulty Controller: An overheating or failing motor controller can cause sudden power surges or complete shutdowns.
- Brake Cut-off Sensor: A stuck or faulty brake sensor can trick the system into thinking the brakes are applied, cutting power to the motor.
- PAS Sensor: A misaligned Pedal Assist System (PAS) sensor can cause jerky or intermittent motor assistance, making it feel like a power problem.
Understanding Electric Bicycle Battery Failure Causes
Understanding why an electric bicycle battery failure happens can help you prevent future problems. Most issues stem from how you use, store, and charge your battery. Knowing these common causes empowers you to extend your battery’s lifespan.
Deep Discharge and Improper Storage
You should never let your lithium-ion battery drain completely to 0%. This is called a deep discharge, and it can quickly cause permanent damage. Proper storage is also crucial for battery health.
- For long-term storage, keep your battery’s charge level between 40% and 50%.
- This prevents the voltage from dropping below a safe minimum of 3.0V per cell.
- Storing a fully charged or completely dead battery will shorten its life.
Natural Aging and High Cycle Count
Every lithium-ion battery has a limited lifespan. This is measured in charge cycles. A charge cycle is one full use of the battery’s capacity, from 100% to 0%. Most batteries are rated for 500 至 1,000 个循环 before their performance drops significantly. As a battery ages, its internal resistance increases. This makes it harder for the battery to deliver power, causing the voltage sags you might feel when climbing a hill. This gradual decline is a normal part of the battery’s life.
Damage from Extreme Temperatures
Extreme temperatures are a major cause of battery failure. Both heat and cold can cause serious damage. An overheating battery is a significant risk, as high temperatures degrade cells quickly. Cold weather presents a different danger.
You should never charge your battery in freezing temperatures below 0°C (32°F). Charging in the cold can cause metallic lithium to form inside, leading to permanent damage and an increased risk of failure. Always bring your battery to room temperature before charging it.
Internal Component Faults
Sometimes, an electric bicycle battery failure is due to a problem inside the pack itself. The battery management system (BMS) is a common point of failure. The BMS is the battery’s brain, and if it malfunctions, it can prevent proper charging and discharging. Other internal issues can include:
- Cracked components from overheating.
- Burnt solder joints from power surges.
- Broken or loose wires causing short circuits.
These internal faults often require professional diagnosis and repair.
Final Diagnosis: Repair or Replace
After your tests, you face a final decision: can you fix the battery, or do you need a new one? This choice depends on the problem’s severity. Some issues have simple solutions, while others signal a complete battery failure. This guide will help you choose the right path.
Simple Fixes You Can Perform Now
Before you consider a replacement, try these simple solutions. Many battery problems come from basic maintenance oversights. These steps offer easy and effective solutions you can perform yourself.
- Use the original charger that came with your e-bike.
- Inspect your charging cables and ports for any visible damage.
- Charge your battery in a cool, shaded area away from extreme temperatures.
- Clean the battery and charger connectors with a clean, dry cloth.
- Make sure your battery’s voltage (e.g., 36V, 48V) matches your bike’s system.
When to Contact a Professional
Some problems require an expert. If you notice any of the following issues, you should contact a professional e-bike technician. These are often signs of internal damage that is unsafe for you to handle. These solutions are best left to an expert.
- The battery shuts down unexpectedly when you ride uphill.
- Your battery’s capacity drops below 70% of its original range.
- You measure irregular voltage readings, like a 36V battery dipping below 32V.
Signs of Imminent Battery Failure
A swollen, cracked, or leaking battery is a clear sign you need a replacement. Do not try to fix it. A damaged battery is a serious fire hazard. When you buy a new battery, you have a choice between OEM and third-party options.
Choosing a Replacement Battery 一个 OEM (Original Equipment Manufacturer) battery is the safest choice. It guarantees compatibility and quality. Some reputable third-party brands offer good value, but generic options carry higher risks. Always verify safety credentials and user reviews before purchasing. Your best solutions will prioritize safety.
You have now diagnosed your e-bike battery. Your tests likely revealed a simple fix, a degraded battery needing careful use, or a failed battery requiring replacement. This knowledge helps you decide your next steps.
⚠️ Your Safety is Most Important If you see any physical damage like swelling or leaks, stop immediately. You should always contact a professional when you feel unsure.
Proper battery care empowers you to prevent future problems. You can now ride with confidence and keep your e-bike running smoothly for years.
常见问题
How long should my e-bike battery last?
Your e-bike battery should last for 3 to 5 years. Most batteries provide 500 to 1,000 charge cycles. You can extend this lifespan with proper care. Avoid extreme heat or cold and store it with a partial charge.
Can I repair a swollen e-bike battery myself?
No. You must never attempt to fix a swollen battery. It presents a serious fire risk. You should stop using it immediately. A professional can help you dispose of it safely and find a replacement.
Why won’t my battery charge with a good charger?
Your battery’s charging port may be dirty or damaged. A faulty internal Battery Management System (BMS) could also be the cause. If cleaning the port does not solve the problem, you should contact a professional for diagnosis.
What should I do if my battery gets wet?
You should disconnect the battery from your bike right away. Dry the outside with a soft cloth. Let it air dry in a safe place for at least 24 hours before you use it again.