

如果您正在制造、升级或只是想最大限度地利用您的遥控汽车、无人机、飞机或船只,选择合适的锂聚合物连接器不仅仅是为了匹配插头--而是为了提高性能、确保安全,并使自己免于日后的重大麻烦。
我花了十多年的时间修补、比赛和偶尔烧毁几乎所有 RC 类别的连接器。本指南提炼了真实世界的经验、最新数据和实用建议,帮助您自信地为自己的项目选择(和安装)理想的锂聚合物连接器--无需电子工程学位!
您将取得的成就
- 识别和比较常用的 RC LiPo 连接器类型(2025 年更新)
- 遵循循序渐进、情景驱动的连接器选择流程
- 了解专业安装和安全提示
- 发现并修复常见陷阱和连接器错误
- 下载核对表,查看直观教具,参考经过审核的资源
预计完成时间: 15-40 分钟(如果是第一次安装,时间会更长)
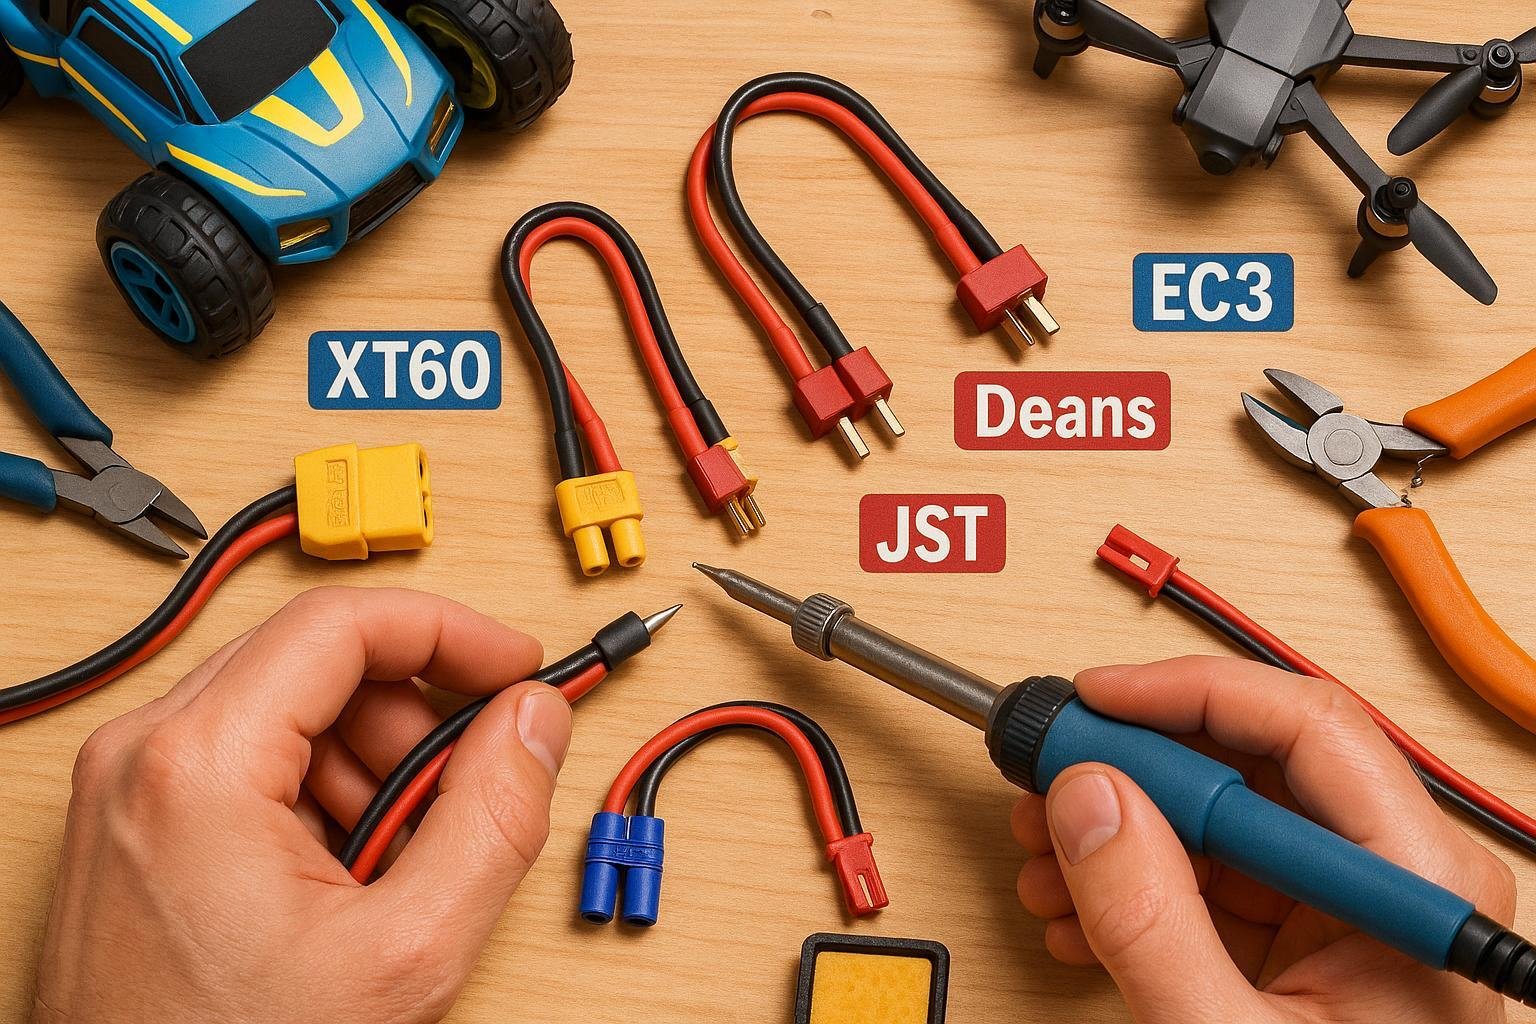
遥控锂电池连接器类型一览 (2025)
以下是最常见遥控连接器的快速参考表,其中列出了近年来发生(或未发生)的变化:
| 连接器类型 | 最大持续电流 | 典型用例 | 安装难度 | 特点 |
|---|---|---|---|---|
| XT30 | ~30A | 微型无人机、小型遥控飞机 | 简单 | 结构紧凑、电阻低 |
| XT60 | ~60A | 中型无人机、1/10 汽车、飞机 | 简单 | 安全锁,封闭式插销 |
| XT90 | ~90A | 大型四轮车、飞机、卡车 | 中度 | 大触点,耐热 |
| 迪恩斯 (T) | ~60-80A | 旧式装备、汽车(传统) | 中度 | 弹针,紧凑型(使用较少) |
| EC3/EC5/EC8 | 60-120A | 飞机、轮船、大功率汽车 | 中度 | 卡入式,防火花(EC5/8+) |
| JST | 3-5A | 超轻型无人机,平衡引线 | 简单 | 体积小、重量轻,适用于低电流 |
| JR | ~15-20A | 伺服器、老式遥控装置 | 简单 | 可靠的基本装备 |
| TRX(特雷克斯) | 60-80A | 大功率 Traxxas 汽车、船 | 中度 | 坚固、专有 |
更多详情,请查阅 Horizon Hobby 的 2025 概述 或 优辉电池图解指南.
专业提示 XT 系列(Amass)连接器融合了电流容量、易用性和广泛的可用性,因此占据主导地位。Deans和EC系列仍用于传统设置或具有防火花功能。
逐步指南:为您的遥控模型选择合适的连接器
1.计算最大电流需求
- 查找电调或电机的最大额定持续电流。
- 至少增加 20% 安全系数 (例如,40A ESC → 选择额定值为 48A+ 的连接器)。
- 使用快速公式:
最大电机电流 × 1.2 = 最小连接器额定值
为什么? 尺寸不足的连接器会过热,导致电压骤降,并可能在负载下熔化。 有一次我输掉了比赛,因为我的连接器在发射时真的熔断了。
2.将连接器与遥控应用相匹配
- 微型无人机/纳米遥控装置: 使用 JST 或 XT30
- FPV 赛车/5 "无人机/小型汽车: XT30 或 XT60
- 1/10 遥控汽车/中型四轮驱动车/大型飞机: XT60, Deans, EC3
- 卡车、大飞机、船: XT90、EC5/EC8,有时为 TRX
情景示例:
- 对于耗电量为 40A 的轻型 4S 5″ FPV 四轮飞行器而言,XT60 是理想之选:XT60 是理想之选。
- 制造 1/8 重型卡车?用 XT90 或 EC5 来处理放大器和压力。
- 老式遥控车,自带迪恩斯系统?除非你要将车队标准化,否则就坚持使用它。
3.检查机械和安装配合
- 连接器是否适合电池槽或车架?
- 是否有足够的空间方便插拔?
- 您有好的烙铁和合适的线规吗?
连接器和导线指南:
| 连接器 | 支持的线规 |
|---|---|
| XT30 | 20-26 AWG |
| XT60 | 12-18 AWG |
| XT90 | 10-14 AWG |
如果不确定,可在焊接前 "干配 "连接器和导线。
4.评估成本和可用性
- 坚持使用大品牌 (Amass、Traxxas、EC),避免山寨货。
- 小心假接头! 它们经常会过热或融化,让人痛苦不堪。
- 连接器标准化 如果可能的话,可以跨机型共享电池,这样会更方便。
5.优先考虑安全和极性
- 再次检查导线方向 每次都这样。许多连接器没有极性保护!
- 使用热缩管和应力消除器 每一个焊接点。
- 在插入电池之前,一定要用万用表测试新的连接器。
打印清单:锂电池连接器决策流程
- [ ] 确定最大电流要求(电调/电机规格)
- [ ] 至少增加 20% 净空
- [ ] 交叉检查应用程序(无人机、汽车、飞机、船只)
- [ ] 确认电线规格和连接器的兼容性
- [ ] 确保机械/空间配合
- [ ] 选择原装品牌连接器(无仿冒品)
- [ ] 计划焊接/安装工具
- [ ] 首次使用前测试极性
- [ ] 尽可能标准化
保存或打印此清单,供建设日参考!
安装连接器:实际操作演练
你需要的工具
- 烙铁(建议 40 瓦以上)
- 焊料(松香芯,60/40 或无铅)
- 通量
- 剥线器
- 热缩管
- 万用表
- 要有耐心(尤其是第一次尝试时!)。
逐步进行:
- 准备
- 组装所有齿轮,选择正确的连接器和线规。
- 带材和锡:
- 剥去 ~4mm 绝缘层。拧紧/锡合导线端头和连接器片。
- 焊接:
- 将镀锡导线放在镀锡连接器上,加热/焊接。避免冷接头。
- 仔细检查极性:
- 红色代表 "+",黑色代表"-"(一定要核实--即使是专业人士也会出错!)。
- 热缩管滑套
- 立即覆盖接缝处;使用热风枪使其牢固贴合。
- 测试:
- 使用万用表检查连续性和极性是否正确。
- 第一个启动项
- 以最低负载供电,并监控发热/连接情况。
预计时间 初学者 15-30 分钟,老手 5-10 分钟。 请观看详细的视频演示(FliteTest).
安装陷阱
- 冷焊(焊点无光泽、颗粒状)
- 极性反转(灾难性的--一定要测试!)。
- 跳过热缩管(短路风险)
- 长时间焊接造成连接器熔化
如果不确定,可先在备用导线/连接器上练习--这是一项很快就能提高的技能。
故障排除与修复:常见的锂聚合物电池连接器问题
1.连接器过热
- 症状 塑料变软、插头发热、变色
- 修复: 升级到更高等级的连接器或重新焊接以获得更好的接触效果
2.松动或晃动
- 症状 断电、卡顿、设备重置
- 修复: 更换连接器(不要尝试用钳子 "压接 "连接器)
3.极性交叉或接线错误
- 症状 火花、电子元件烧毁、设备无法开机
- 修复: 卸下电池,立即检查,正确焊接。重新连接前进行测试。
4.神秘的电压下降或断电
- 症状 意外减速、遥测警告
- 修复: 检查焊点和线规;必要时更换连接器
5.假冒/低质量连接器故障
- 症状 早期磨损,在较低电流下熔化
- 修复: 从信誉良好的品牌采购;避免从可疑的电池供应商处购买 "额外附送 "的电池
一定要定期检查连接器是否有磨损、点蚀或腐蚀迹象,尤其是户外和高循环车辆。
专业人士的最佳实践和实用技巧
- 尽量减少阻力: 保持电线短、焊点整齐,并使用新的连接器
- 应力消除 始终使用热缩管和支撑线,以防止它们在焊点处弯曲
- 标签极性: 使用彩色收缩膜或胶带即时 +/- ID
- 避免转接链: 连接器越多,阻力越大,连接越弱
- 防风雨: 对于船只/潮湿环境,使用绝缘脂并检查是否有腐蚀现象
- 警惕假冒: 仔细检查品牌标记和针脚质量 (详细指南)
- 船队标准化: 运行多个型号?尝试合并使用一种连接器类型(XT60 或 EC5 是常用的连接器类型),以节省时间和资金
- 频繁交换: 如果经常更换电池/连接器,请每月检查连接器是否有磨损迹象
其他资源
如果您遇到困难或想要了解更多真实世界的教程,请查看 飞行测试 视频库,用于连接器焊接演练和故障排除。
最后的鼓励测试、飞行、享受乐趣
作为一名遥控迷,多花一点时间挑选和安装正确的锂聚合物连接器,将使您免于无数的麻烦、烧毁的电线和错过的飞行课程。采取每一个安全步骤,仔细检查您的工作,您将从遥控冒险中获得最佳体验。
有问题要问,或者有来之不易的小窍门要分享?请在下方留言,社区将竭诚为您服务!