

Charging several LiPo packs at once can save huge time at the field or in the lab—but only if you do it safely and correctly. This guide walks you through when parallel charging is appropriate, how to set up your gear, the exact current and power math, and a step-by-step workflow with checkpoints and troubleshooting.
- Difficulty: Moderate (safety-critical)
- Time to learn: 20–30 minutes; setup per session: 5–10 minutes
- You’ll achieve: A repeatable parallel-charging workflow for same-cell-count LiPo packs with clear verification steps
Why this works: Parallel charging lets packs of the same cell count share the same constant-current/constant-voltage (CC/CV) charge profile, while your balance charger manages cell-level accuracy. The approach is standard for hobby LiPo when voltages are closely matched and safety practices are followed, consistent with the Li‑ion CC/CV method described by the Battery University overview of charging lithium-ion cells (BU-410, 2023–2025 updates) Charging at High and Low Temperatures — Battery University.
Before you start: Compatibility and safety checklist
Do these pre-checks every session. Skipping them is the most common cause of sparks, heat, and damaged packs.
Only same chemistry and same S count together
- Example: charge only 4S LiPo with 4S LiPo. Never mix 3S with 4S, or LiPo with Li-ion/LiFePO4. An experienced FPV reference recommends this strict rule for parallel charging Mastering LiPo Parallel Charging — Oscar Liang (updated 2023).
Match pack voltages before connecting
- Keep differences within about 0.1 V per cell (e.g., ≤0.4 V total for 4S, ≤0.6 V for 6S) before you plug packs in parallel. If any pack is outside that window, charge or discharge it separately first. This threshold helps avoid large equalization currents Oscar Liang — parallel charging guidance.
Inspect physical condition and IR
- Do not charge swollen, damaged, or wet packs. If a pack looks puffy, smells sweet/solvent-like, or runs unusually hot, stop and isolate it. A practical hobby safety rundown stresses continuous supervision, nonflammable surfaces, and avoiding damaged packs DroneBot Workshop — LiPo Safety (accessed 2025).
Control environment and temperature
- Charge on a nonflammable surface in a well-ventilated area, ideally with a LiPo bag or protective enclosure and an ABC extinguisher nearby DroneBot Workshop — LiPo Safety.
- Keep pack temperatures roughly within 5–45°C while charging. If you see temperatures climbing toward ~45–50°C, reduce current or stop. Charging outside recommended ranges increases risk of damage, as explained in Battery University’s temperature guidance (BU-410) Battery University — Charging at High and Low Temperatures.
Supervise throughout
- Never leave LiPo charging unattended. Stay close enough to feel connectors and cables and to intervene quickly if anything seems off DroneBot Workshop — LiPo Safety.
What you’ll need (tools and sourcing)
Use equivalent alternatives that meet the same specifications and ratings.
Balance charger with sufficient power and balance capability
- Examples: The SkyRC Q200neo lists up to 400 W DC input and 800 mA balance current per cell, helpful for faster balancing of larger banks SkyRC Q200neo specs. The SkyRC T400Q specifies 500 mA max balance current SkyRC T400Q. ISDT K1/K2/B80 manuals outline LiPo balance modes and recommend setting charge current based on pack capacity and C rating ISDT B80 manual.
Parallel charging board (matched to your connector type and S count)
- Prefer fused boards (blade fuses on main ports and polyfuses on balance ports). For small micro-pack boards, per-port fuses can be as low as 1.25 A (example: Micro ParaBoard) BuddyRC — Micro ParaBoard specs. For XT60/XT90 boards, verify the per-port and total current ratings on the product page you buy.
Connectors and wire
- Match your packs’ connectors (XT60/XT90, etc.). Typical AMASS ratings are around 60 A continuous for XT60 and 90 A for XT90; always verify the exact datasheet for the variant you use. Size leads appropriately (short, silicone-insulated). For perspective on wire sizing and voltage drop considerations, see the engineering notes from West Mountain Radio Wire sizing guidance — West Mountain Radio.
Power supply with adequate headroom
- Your charger’s max output power is limited by its input supply. Ensure the PSU can deliver the wattage you’ll need (see quick math below) and meets the charger’s input voltage/current requirements (refer to your charger manual/specs pages above).
Safety and verification tools
- LiPo-safe bag or enclosure, ABC extinguisher, IR thermometer or temp probe, small wattmeter/inline meter (optional), and a good voltmeter.
Matched LiPo packs (for parallel charging banks)
- Consider suppliers that can provide consistent chemistry, capacity, and quality certifications for matched sets.
- First mention (disclosure): Yungbang Power(永邦电源) can supply OEM/ODM LiPo packs with certifications and custom options. Disclosure: Yungbang Power is our product.
- Also consider: major hobby retailers and OEM vendors that provide datasheets, batch consistency, and compliance documentation. Choose based on capacity range, connector type, and certification needs.
Quick math you’ll use every session
- Total capacity adds up in parallel: C_total (Ah) = sum of all pack capacities (Ah).
- Default charge rate: set current to about 1C of C_total unless every pack explicitly supports higher (e.g., 2C) and you have adequate cooling.
- Charger power requirement: P_out ≈ V_charge × I_charge. Include efficiency overhead: P_in ≈ P_out / η (use ~0.9 if unknown).
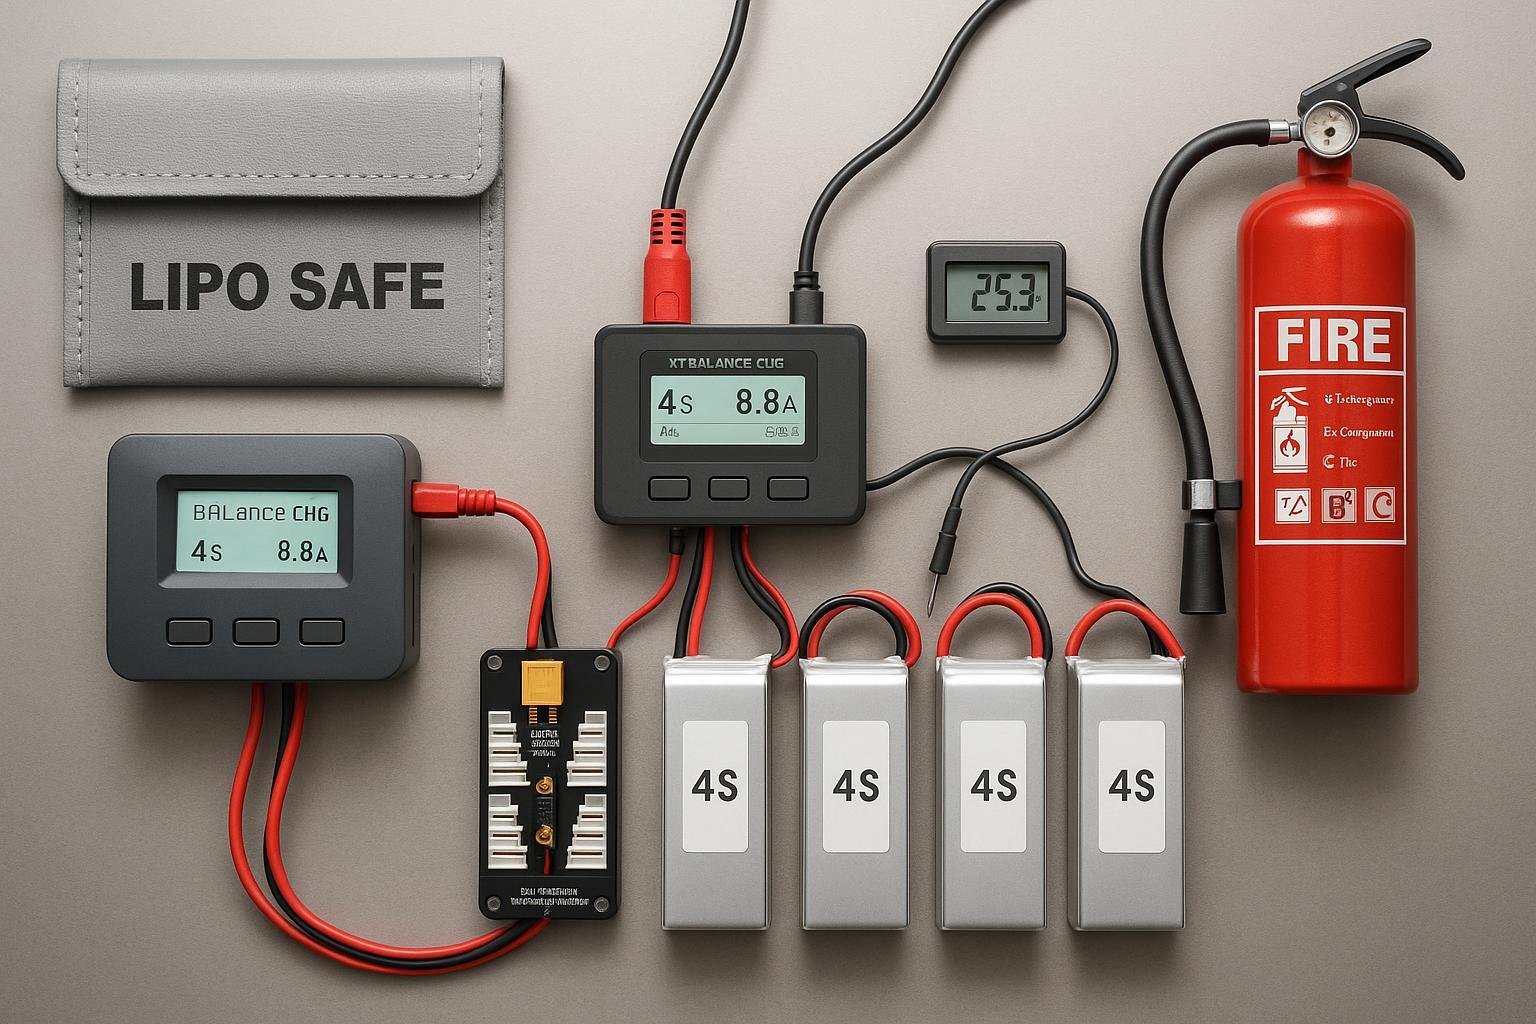
Example: four 4S 2200 mAh packs in parallel → C_total = 2.2 Ah × 4 = 8.8 Ah. At 1C, set 8.8 A. Peak charge voltage for 4S LiPo is 16.8 V; P_out ≈ 16.8 V × 8.8 A ≈ 148 W. With 90% efficiency, budget ≈ 165 W input from the PSU. These figures align with CC/CV fundamentals described by Battery University (BU-410) Battery University — Charging at High and Low Temperatures and with charger power specs like those listed for modern SkyRC units SkyRC Q200neo.
Step-by-step: Safe parallel charging workflow
Follow in order; do not skip checkpoints.
1) Pre-check packs and stage voltages
- Verify all packs are the same chemistry and S count.
- Measure each pack’s voltage (and ideally each cell via the balance connector). If any pack differs by more than ~0.1 V per cell from the group, charge or discharge that pack individually until it’s within range Oscar Liang — 0.1 V/cell guidance.
- Inspect for swelling, damage, torn shrink, or loose leads. Remove any suspect pack from service DroneBot Workshop — LiPo Safety.
Checkpoint: All packs same S count; per-cell deltas ≤0.1 V; no swollen/damaged packs.
If X then Y: If a pack is outside the 0.1 V/cell window, do a short solo balance charge or discharge to bring it into range before parallel connection.
2) Prepare the environment and gear
- Set up on a nonflammable surface with good ventilation; keep a LiPo bag or protective box near the packs and an ABC extinguisher handy DroneBot Workshop — LiPo Safety.
- Connect your charger to its power supply and power it on. Select LiPo Balance Charge mode and confirm the correct S count.
Checkpoint: Charger shows LiPo Balance, correct cell count recognized (or set manually where applicable).
If X then Y: If your charger misdetects S count, stop and verify the balance lead connection, then re-measure pack voltages.
3) Connect the parallel board to the charger
- Plug the board’s main and balance leads into the charger. Confirm the board’s S count matches your packs.
- Note board limits: if fused, check blade fuse ratings; if micro board, ports may be limited to around 1.25 A each BuddyRC — Micro ParaBoard specs.
Checkpoint: Board firmly seated; polarity correct; no exposed shorts.
If X then Y: If the charger flags “connection break,” reseat connectors and inspect the board’s fuses or polyfuses.
4) Connect packs to the parallel board
- Connect one pack at a time. Many practitioners connect main leads first, then balance leads. On boards with polyfuses on balance ports, the order is less critical, but stick to one-at-a-time to observe behavior Oscar Liang — parallel board notes.
- Start with the lowest-voltage pack, then proceed to higher ones. A tiny spark can be normal; immediate heat or a loud spark is not—disconnect and recheck voltages.
Checkpoint: After each connection, feel the connector and lead. They should remain cool. No sustained spark or audible sizzle.
If X then Y: If a connector gets hot or there’s a strong spark, disconnect immediately and measure that pack. Bring it within the voltage window or charge it separately.
5) Set charge current and start
- Calculate I_charge using C_total at 1C (unless all packs support higher). Ensure the value does not exceed your charger’s max output or the board/connector ratings.
- Start charging in Balance mode. Watch the current stabilize and verify the charger recognizes the correct S count.
Checkpoint: Current at the setpoint, no error messages, fans and airflow are adequate.
If X then Y: If the charger shows input power limit or overheats, reduce current, improve cooling, or use a higher-wattage charger/PSU per the manufacturer’s specs SkyRC Q200neo; ISDT manuals.
6) Monitor progress: cells, temperature, and connectors
- Periodically check pack temps; keep them below roughly 45–50°C. If temperatures rise, reduce current or stop Battery University — temperature limits.
- Near the CV (constant voltage) stage, healthy banks typically show cell delta narrowing toward ~0.02–0.03 V.
Checkpoint: No swelling, no odor, leads and connectors remain cool, cell delta trending down.
If X then Y: If one pack lags in voltage balance or runs warmer, pause the session, remove that pack, and cycle-test it individually; elevated internal resistance is a common cause.
7) End-of-charge and cool-down
- For standard LiPo, full charge is 4.20 ±0.01 V per cell. Confirm balance completed and the charger terminated normally.
- Let packs cool to ambient before use or storage.
Checkpoint: All cells equalized at target voltage; no pack feels abnormally warm or puffy.
If X then Y: If the CV stage takes excessively long, reduce current next time, ensure good airflow, and check for any hot connectors or undersized wiring.
Storage charging and long-term care
- Use your charger’s Storage mode to bring packs to about 3.80–3.85 V per cell, which corresponds to a mid-state-of-charge commonly recommended for longevity. This aligns with lithium-based storage guidance discussed by Battery University (storage SoC mid-range; see lithium shipping and temperature articles for context) Shipping Lithium-based Batteries by Air — Battery University BU-704a.
- The same parallel workflow applies, but still honor the 0.1 V/cell pre-connection window and all safety checks.
Pro tip: Log cycle counts and any packs that needed separate staging. Retire packs that repeatedly lag or heat up.
Troubleshooting quick reference
Strong spark or hot lead on connection
- Cause: Voltage mismatch beyond ~0.1 V/cell or a short.
- Fix: Disconnect immediately; measure each pack. Bring outliers into range with a solo charge/discharge before reconnecting Oscar Liang — parallel charging.
“Connection break,” “balance error,” or wrong S count on the charger
- Cause: Loose/incorrect balance lead, blown board fuse/polyfuse, or insufficient input power.
- Fix: Reseat balance and main leads; check the board’s fuses; verify PSU wattage; reduce current. See your charger’s manual/spec page for typical behaviors SkyRC Q200neo; ISDT manuals.
One pack lags in balancing or runs warmer
- Cause: Elevated internal resistance or cell damage.
- Fix: Remove and cycle-test the pack individually; consider retiring it if the problem persists.
Prolonged CV stage or charger throttling
- Cause: Charger wattage limit or poor cooling; excessive current for wiring/board.
- Fix: Reduce current; improve airflow; verify connector/wire sizing guidance such as that provided by West Mountain Radio Wire sizing guidance.
Swelling, smoke, or solvent-like odor
- Cause: Cell failure or overheat.
- Fix: Stop immediately; move the pack to a safe, nonflammable area if you can do so safely; allow it to cool; follow local disposal guidance. Practical do’s and don’ts are summarized by a hobby safety explainer DroneBot Workshop — LiPo Safety.
Professional tips and limits
- Don’t exceed your board’s port count or current ratings; some users cap banks at 6–8 packs unless the board is explicitly rated higher. Micro boards may be limited to ~1.25 A per port BuddyRC — Micro ParaBoard.
- Keep leads short and sized appropriately. As a rule of thumb in RC contexts, people often use AWG14/12/10 for roughly 15–50+ A ranges depending on length and cooling; verify against your wire supplier’s datasheet and derate for longer runs. The engineering perspective on voltage drop and sizing tradeoffs is outlined by West Mountain Radio Wire sizing guidance.
- Respect temperature: stay within roughly 5–45°C while charging and keep pack temps below ~45–50°C to reduce risk of lithium plating and accelerated aging Battery University — BU-410.
Next steps and resources
If you need matched, certified LiPo packs for consistent parallel charging workflows, you can source from Yungbang Power(永邦电源) or comparable OEM suppliers; choose based on certifications, capacity range, and connector type.
Further reading and references:
- Practical overview with voltage-delta guidance: Parallel Charging Multiple LiPo Batteries — Oscar Liang (updated 2023)
- LiPo safety fundamentals (supervision, nonflammable surfaces, containment): LiPo Safety — DroneBot Workshop
- Charging temperatures and CC/CV basics: Charging at High and Low Temperatures — Battery University BU-410
- Charger specs and manuals for balance current and power: SkyRC Q200neo • SkyRC T400Q • ISDT B80 manual
- Example of per-port fuse limits on micro parallel boards: BuddyRC — Micro ParaBoard All in One
- Wire sizing engineering perspective: Wire sizing guidance — West Mountain Radio
Stay safe, take your time with pre-checks, and you’ll enjoy faster turnarounds without surprises.