

Choosing a 4S LiPo charger shouldn’t feel like guesswork. This guide walks you through exactly how to size current and wattage using P = V × I, decide between AC and DC power, pick single vs. dual channel (and when to use parallel charging), and verify safe operation with clear checkpoints. Expect to spend 10–15 minutes doing the math and another 10 minutes validating features before you buy.
- Difficulty: Beginner to intermediate
- Prerequisites: Know your battery’s capacity (mAh), chemistry (LiPo vs. LiHV/LiFe), and connector types (e.g., XT60/XT30)
- Goal: Select a charger that safely and efficiently charges your 4S packs for home and/or field use in 2025
What “4S LiPo” Means and Why It Matters
- A standard LiPo cell charges to a maximum of 4.20 V; a 4S pack therefore has a maximum of 16.8 V and a nominal of about 14.8 V. Overcharging beyond 4.20 V per cell risks swelling and thermal events, which is why balance charging is essential according to the 2024–2025 hobby references from manufacturers and educators such as the Grepow voltage overview (max 4.20 V/cell) and the EuroRC LiPo use and charge guide (nominal 3.7 V/cell).
- Default safe charge rate is 1C unless your battery datasheet explicitly allows higher (e.g., 2C). This conservative default is echoed in community educator resources like the Oscar Liang LiPo battery guide (1C default).
- Storage mode keeps cells around 3.7–3.85 V per cell to prolong life—see the RC Helicopter Fun storage guidance (3.7–3.85 V/cell).
Why this matters: Your charger must detect and balance 4 cells correctly and provide enough current and power—without exceeding safe limits.
Step 1: Determine your pack’s 1C charge current
1C is simply “capacity in amps.” Convert mAh to Ah, then that number is your 1C current.
- Example conversions:
- 4S 1550 mAh → 1.55 Ah → 1C = 1.55 A
- 4S 5200 mAh → 5.2 Ah → 1C = 5.2 A
- 4S 10,000 mAh → 10 Ah → 1C = 10 A
Tips from experience:
- Stick with 1C unless your battery’s label or datasheet explicitly states 2C or higher is allowed. Charging faster increases heat and stress.
- If your packs are older or show higher internal resistance (IR), consider 0.5–0.8C for gentler charging.
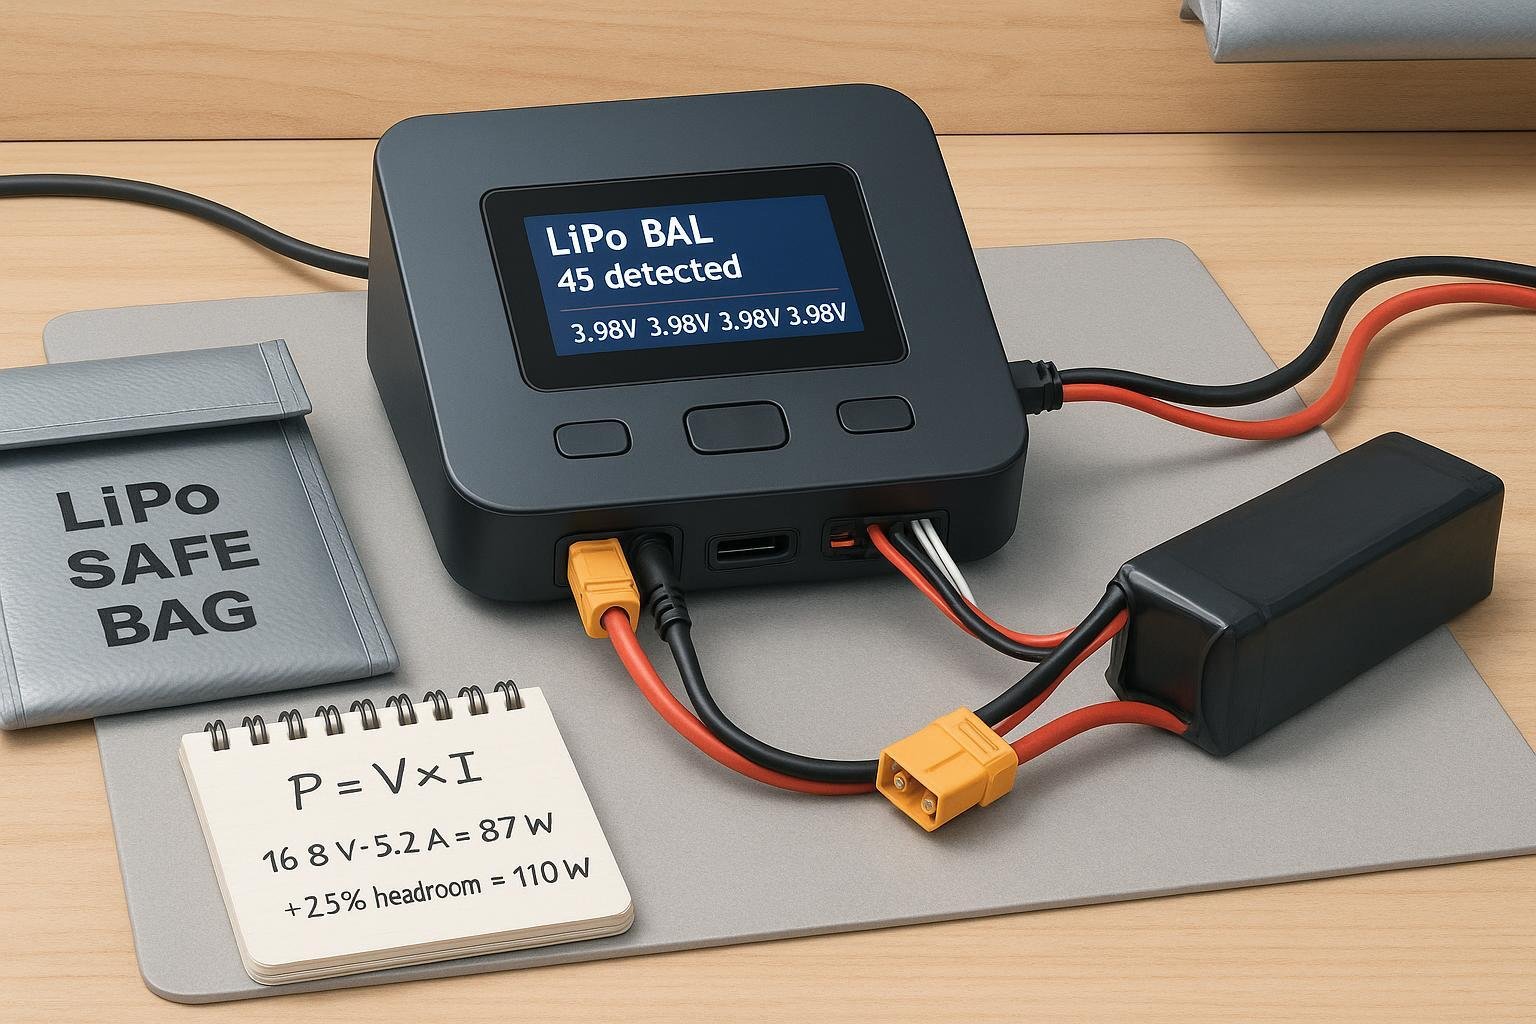
Step 2: Calculate required per-channel wattage using P = V × I
At the end of charge, a 4S pack is at 16.8 V. Use that maximum when sizing wattage, then add 20–30% headroom for efficiency losses and constant-voltage taper. This rule-of-thumb approach is standard in hobby charging guides like the Oscar Liang charger and power supply guide (power math).
- Formula: Required watts (per channel) ≈ 16.8 V × charge current (A) × 1.25 (headroom)
Mini-calculation callouts
- 4S 1550 mAh at 1C: 1.55 A → 16.8 × 1.55 ≈ 26 W → with 25% headroom ≈ 33 W
- 4S 5200 mAh at 1C: 5.2 A → 16.8 × 5.2 ≈ 87 W → with 25% headroom ≈ 110 W
- 4S 10,000 mAh at 1C: 10 A → 16.8 × 10 ≈ 168 W → with 25% headroom ≈ 210 W
Practical advice:
- If you plan to charge at 2C (only if your pack allows), double the current and therefore roughly double the wattage needs.
- Multi-channel chargers may share a total power budget—your per-channel power can throttle under AC. We’ll cover this next.
Step 3: Decide AC-only vs. DC-only vs. AC/DC
- AC/DC combo chargers are convenient at home, but their AC mode often has a lower total power cap because of the internal power supply. Many models offer more output when fed with an external DC source. A common official example is the SkyRC Q200neo product page (AC 200 W total vs DC 400 W total; up to 100 W/port). The exact numbers differ by model, but the behavior—higher output on DC—is widespread.
- DC-only chargers usually require an external DC power supply or a field battery. They’re often more compact and powerful for their size but add the cost/complexity of a PSU.
- AC-only chargers are plug-and-play but can be limited in total wattage; check whether they meet your per-channel wattage needs for larger 4S packs.
How to choose quickly:
- Mostly home use, modest pack sizes (≤5200 mAh) and single-channel: AC/DC combo with adequate AC power is fine.
- Field use or frequent dual-channel/parallel charging: favor DC-capable chargers and plan a suitable PSU or field battery setup.
Step 4: Choose single vs. dual channel—and when to parallel charge
- Single channel is simplest and often cheaper. If you only need to charge one pack at a time, size it correctly and keep it simple.
- Dual or multi-channel is great for racers and club flyers charging multiple packs concurrently. Just remember the total AC cap may throttle per-channel power when both channels run.
- Parallel charging lets you charge multiple packs on one channel—useful for FPV pilots with many 4S 1300–1800 mAh packs. However, follow strict rules backed by hobby educators like the Oscar Liang parallel charging guide (same S-count; SoC within ~0.05 V/cell) and the RC Helicopter Fun parallel charging guide (safety and procedure):
- Only connect packs with the same cell count (all 4S).
- Match state-of-charge within about 0.05 V per cell (~0.2 V total for 4S) before connecting.
- Prefer similar capacities and ages to keep currents distributed more evenly.
- Use a quality parallel board with fuses/polyfuses and correct connectors.
Wattage implications for parallel:
- Total current equals the sum of each pack’s current at the chosen C-rate. Example: four 4S 1550 mAh packs at 1C → 1.55 A × 4 = 6.2 A. Required power at end ≈ 16.8 × 6.2 ≈ 104 W; add 25% ≈ 130 W.
Step 5: Verify safety features and useful UI before you buy
Must-have functions and protections (typical on modern chargers):
- Balance charge mode with per-cell readouts and good balance accuracy
- Storage charge/discharge mode (to ~3.7–3.85 V/cell)
- Over-voltage, reverse-polarity, short-circuit, and over-temperature protections, which you’ll find detailed on reputable product pages like the SkyRC B6ACneo and Q200neo listings (protection features)
- Adjustable current limits and clear error messages
Nice-to-have features for power users:
- Internal resistance (IR) measurement per cell to monitor pack health, available on many 2024–2025 chargers per manufacturer manuals such as the ToolkitRC M6DAC product page/manual (IR and updates via USB-C)
- Firmware updates via USB-C for bug fixes and new features
- Power supply mode (some chargers can act as a DC bench supply in a pinch)
Step 6: Run a safe test charge and use verification checkpoints
Before starting
- Set chemistry/mode correctly: “LiPo Balance” for standard LiPo (use LiHV/LiFe only if your pack is that chemistry).
- Confirm detected cell count: your screen should show 4S and all four per-cell voltages. This is a universal safety check across modern charger UIs (see patterns on official pages like the SkyRC Q200neo UI shots for per-cell readouts and ToolkitRC interfaces).
- Inspect all leads and connectors; place the pack on a non-flammable surface and, ideally, inside a LiPo-safe bag or containment box, which safety educators recommend in resources such as the Oscar Liang BAT-SAFE review advocating containment.
During charge
- Monitor temperature. If the pack becomes noticeably warm or exceeds roughly 45–50°C, stop and investigate. This conservative advice aligns with RC educators’ safety guidance such as RC Helicopter Fun’s charging safety notes.
- Watch for input or AC power limits. If you’re using AC on a multi-channel charger, expect throttling as the internal PSU hits its cap (see the SkyRC Q200neo AC vs. DC total power example).
End-of-charge balance quality
- Aim for a tight per-cell delta. Ideally, cells finish within about 0.01–0.02 V of each other; if the spread is greater than ~0.05 V, perform a balance cycle or inspect the pack. Practical tests and reviews from RC educators reflect these thresholds, e.g., Oscar Liang charger reviews showing ~0.01 V balance precision.
Quick-reference: Recommended per-channel wattage for common 4S capacities
These recommendations assume 1C charging and include roughly 25% headroom to avoid throttling near the end of charge.
| 4S Capacity (mAh) | 1C Current (A) | Base Watts at 16.8 V | Recommended Per-Channel Watts |
|---|---|---|---|
| 1300–1800 | 1.3–1.8 | 22–30 W | 28–38 W |
| 3000–5200 | 3.0–5.2 | 50–87 W | 65–110 W |
| 8000–10,000 | 8.0–10.0 | 134–168 W | 170–210 W |
Use the higher end of the recommended range if you want the option to charge a bit faster (or to account for real-world inefficiencies). For 2C-capable packs, double the base watts and scale the recommendation accordingly.
Examples: Put it all together
- Weekend RC car user (single 4S 5200 mAh)
- 1C current: 5.2 A → Base power ≈ 16.8 × 5.2 ≈ 87 W → With headroom ≈ 110 W per channel.
- Recommendation: An AC/DC combo that can deliver around 110 W on a single port is sufficient for 1C. If you plan to use two channels simultaneously on AC, check the total AC limit to avoid throttling.
- FPV pilot (parallel 4 × 4S 1550 mAh at 1C)
- Total current: 1.55 A × 4 = 6.2 A → Base power ≈ 16.8 × 6.2 ≈ 104 W → With headroom ≈ 130 W.
- Recommendation: A DC-capable charger with ≥130 W available on one channel (or higher if you sometimes charge 5–6 packs). Ensure your parallel board has fuses and you’ve matched SoC within ~0.05 V/cell before connecting.
- Club organizer (two large 4S 10,000 mAh packs at 1C, simultaneously)
- Per pack: 10 A → 168 W base → 210 W with headroom.
- Two channels: about 420 W total. On AC, many combo chargers will throttle; use DC input with a sufficiently rated PSU or field battery. The AC vs. DC difference is documented on official pages like the SkyRC Q200neo (AC 200 W total vs DC 400 W total).
- Reading a pack label to set safe current (brand-neutral math)
- Disclosure: Yungbang Power is our product.
- Example: Suppose a 4S LiPo pack label from Yungbang Power shows 5200 mAh and standard LiPo chemistry. 1C = 5.2 A. Required per-channel watts ≈ 16.8 × 5.2 ≈ 87 W → with 25% headroom ≈ 110 W. Set your charger to LiPo Balance, verify 4S detection, and start at 1C.
Note: If your battery datasheet explicitly allows 2C, you could charge at 10.4 A—but confirm your charger and wiring can safely handle the increased current and heat.
Field vs. home charging setups: What to prepare
Home (AC) charging
- Pros: Plug-and-play; minimal extra gear.
- Cons: Total power often capped by the internal PSU; dual/multi-channel charging may throttle under AC.
- Tips: For larger 4S packs (>5200 mAh) or multi-channel use, consider a model with higher AC capacity or plan to use DC input for full power as illustrated by the Q200neo AC vs. DC power behavior.
Field (DC) charging
- Power sources: LiFePO4 or deep-cycle lead-acid battery with adequate amp capacity and a proper fuse. Educator guides discuss field setups and best practices, e.g., the Oscar Liang field charging how-to (DC sources and wiring).
- Accessories: Quality parallel board with fuses, short and appropriately gauged leads, a LiPo-safe bag/box, and optionally a power meter.
- Safety: Keep the setup stable and supervised. Avoid direct sun and high ambient temperatures. If your charger shows “Input Voltage Low,” reduce load or use a higher-capacity DC source.
Troubleshooting: If X happens, try Y
Charger says “connection break” or interrupts the charge
- Likely causes: Loose main lead, balance lead not fully seated, damaged wire, or movement during charge.
- Try: Reseat connectors, immobilize the setup, inspect and replace frayed leads.
Balance port error or cell error
- Likely causes: Misplugged/loose balance lead, damaged balance harness, or a cell out of range.
- Try: Verify the 4S balance plug is fully inserted, check per-cell voltages individually, and do not charge swollen/damaged packs. Guides like RC Helicopter Fun’s safety notes on charging checks emphasize these basics.
Charger or pack overheating
- Likely causes: High ambient temps, blocked ventilation, charging too fast, or internal pack issues.
- Try: Pause to cool, improve ventilation, drop to 1C (or lower), and evaluate pack health. Stop immediately if you see swelling.
Charger throttles on AC or shows low input voltage on DC
- Likely causes: AC internal PSU cap reached; DC source sag; cables too thin/long.
- Try: Reduce charge current; switch to DC with a higher-capacity PSU; shorten/thicken leads. AC vs. DC behavior examples are shown on official pages such as the Q200neo specs (200 W AC vs 400 W DC total).
Incorrect cell count or chemistry detected
- Likely causes: Wrong mode selected, balance lead issue, or poor connection.
- Try: Set LiPo Balance, reseat the balance connector, and confirm the display shows 4S with four cell voltages before starting.
How long will a charge take?
Rule of thumb
- At 1C, a charge from near-empty takes roughly an hour plus 10–20% for the constant-voltage taper and inefficiencies. This aligns with community experience and general lithium CC/CV behavior described in technical references like the Battery University CC/CV overview (general lithium principles). Charging at 2C (if permitted) roughly halves the time but increases stress and heat.
Accessories and safety checklist
- LiPo-safe charging bag or containment box (e.g., BAT-SAFE), recommended by educators such as the Oscar Liang BAT-SAFE review
- Non-flammable charging surface; open, ventilated area
- Quality balance/parallel boards with fuses and matching connectors (XT60/XT30), as highlighted in the Oscar Liang parallel charging guide
- Proper gauge charging leads; short enough to limit voltage drop
- Temperature awareness (hand-checks or a temp probe if available)
- Firmware updates for your charger when available (see examples via ToolkitRC M6DAC docs)
Quick buyer’s checklist (save this)
- Chemistry and mode: LiPo Balance selected; 4S detected with per-cell voltages
- Current sizing: 1C default from capacity (Ah); 2C only if the datasheet says so
- Wattage sizing: 16.8 V × I, plus 20–30% headroom per channel
- Channels: Single vs. dual based on your simultaneous needs
- Power input: AC-only vs. DC vs. AC/DC; consider AC throttling vs. DC capacity
- Safety features: Over-voltage, over-temp, reverse polarity, short-circuit, storage mode
- UI/Tools: Per-cell readouts, IR measurement, firmware updates
- For parallel charging: Same S-count; SoC within ~0.05 V/cell; fused board; similar pack capacities/ages
- Verification: End-of-charge cell delta ideally <0.02 V; investigate if >0.05 V
- Environment: Supervise; use a containment bag/box; ventilate; non-flammable surface
Final reminders
- Balance charging and correct mode selection are non-negotiable safety steps for 4S LiPo.
- Size your charger using the math—don’t guess. Use 16.8 V for end-of-charge, then add headroom.
- Expect AC mode on combo chargers to deliver less total power than DC input; plan accordingly if you run multiple channels or parallel boards.
- If anything looks off—hot pack, unusual swelling, big cell delta—stop and reassess. Your packs and workspace will thank you.
References and further reading
- Voltage limits and storage: the Grepow voltage overview (max 4.20 V/cell) и RC Helicopter Fun storage guidance (3.7–3.85 V/cell)
- 1C default, parallel charging rules, and field setups: Oscar Liang’s guides on LiPo basics, charger/power math, and parallel charging
- AC vs. DC power caps example and UI: SkyRC Q200neo official page (AC 200 W vs DC 400 W total)
- Safe charging practices and troubleshooting basics: RC Helicopter Fun charging safety and checks