

Si usted está construyendo, actualizando, o simplemente tratando de sacar el máximo provecho de su coche RC, drone, avión o barco, la elección del conector LiPo derecho no es sólo acerca de los enchufes a juego - se trata de aumentar el rendimiento, garantizar la seguridad, y ahorrarse grandes dolores de cabeza en la línea.
He pasado más de una década probando, compitiendo y ocasionalmente friendo conectores en casi todas las categorías de RC. Esta guía destila experiencia del mundo real, datos actualizados y consejos prácticos para ayudarle a seleccionar con confianza (e instalar) el conector LiPo ideal para su proyecto, ¡sin necesidad de un título de ingeniería eléctrica!
Lo que conseguirá
- Identifique y compare los tipos de conectores LiPo RC más populares (con una actualización de 2025)
- Siga un proceso de selección de conectores paso a paso y basado en escenarios
- Consejos profesionales de instalación y seguridad
- Detectar y corregir errores comunes y errores de conexión
- Descargue listas de control, vea ayudas visuales y consulte recursos comprobados.
Tiempo estimado de realización: 15-40 minutos (más si se instala por primera vez)
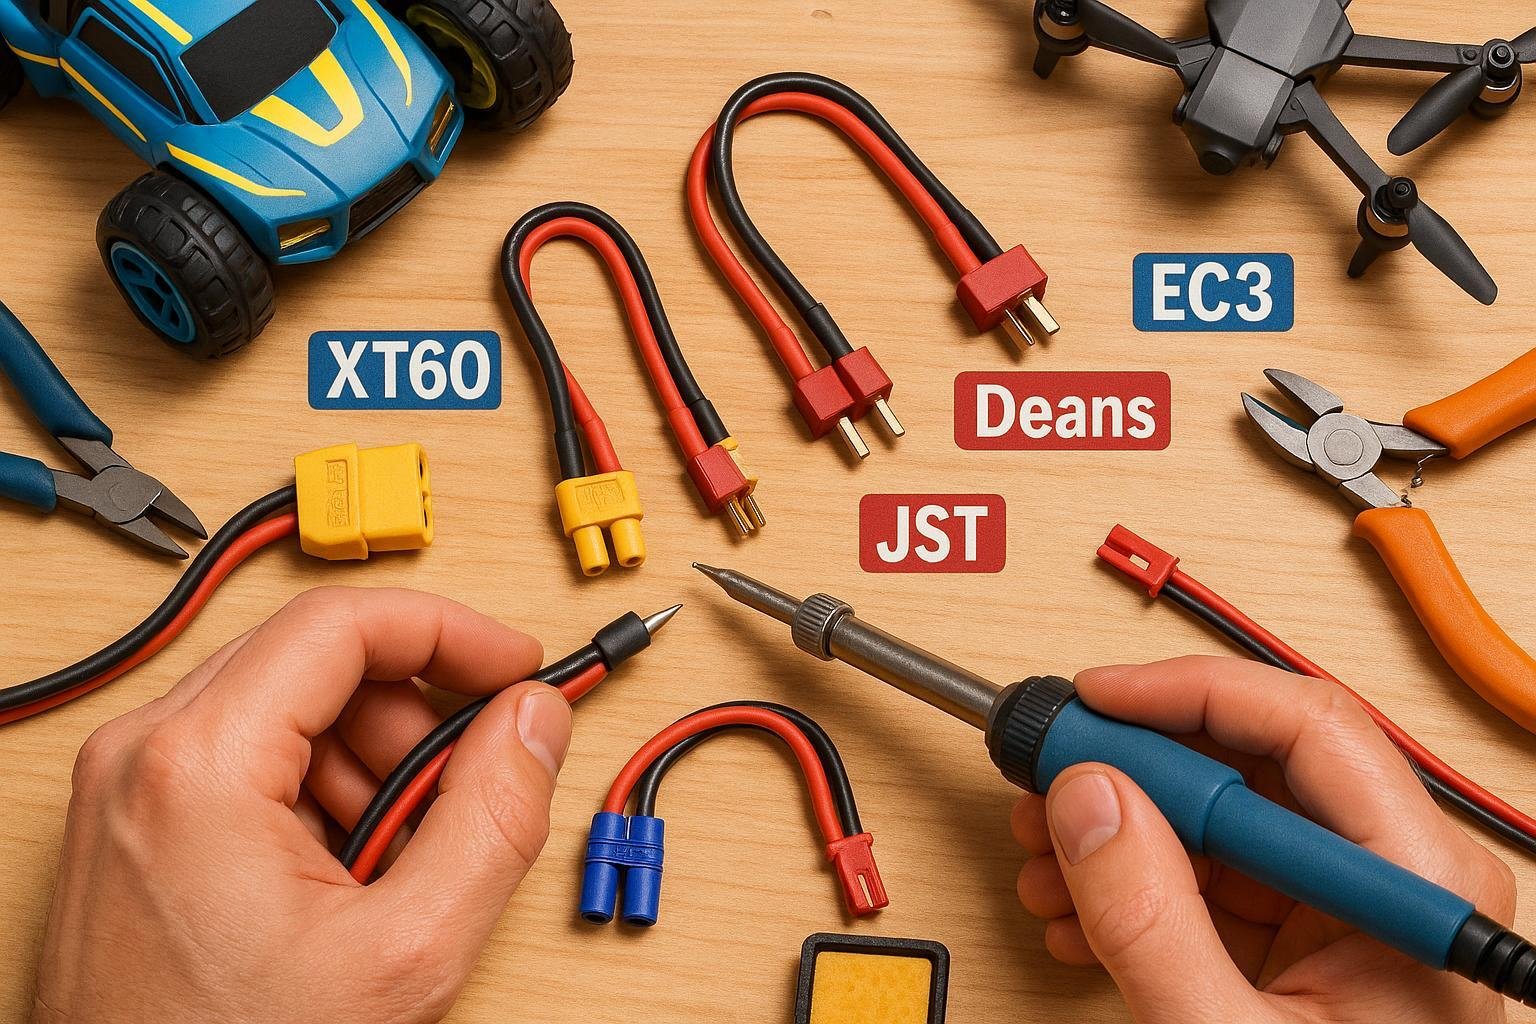
Tipos de conectores LiPo RC de un vistazo (2025)
He aquí una tabla de referencia rápida para los conectores RC más comunes, con lo que ha cambiado (o no) en los últimos años:
| Tipo de conector | Corriente continua máxima | Caso típico | Dificultad de instalación | Características |
|---|---|---|---|---|
| XT30 | ~30A | Micro drones, pequeños RC | Fácil | Compacto, baja resistencia |
| XT60 | ~60A | Drones medianos, coches 1/10, aviones | Fácil | Cierre seguro, pasadores cerrados |
| XT90 | ~90A | Grandes quads, aviones, camiones | Moderado | Contactos grandes, resistentes al calor |
| Decanos (T) | ~60-80A | Equipo antiguo, coches (legado) | Moderado | Pasadores de bala, compactos (menos usados) |
| CE3/CE5/CE8 | 60-120A | Aviones, barcos, coches de gran potencia | Moderado | A presión, antichispas (EC5/8+) |
| JST | 3-5A | Drones ultraligeros, plomos de equilibrio | Fácil | Pequeño, ligero, para baja corriente |
| JR | ~15-20A | Servos, RC de la vieja escuela | Fácil | Equipo básico fiable |
| TRX (Traxxas) | 60-80A | Coches y barcos Traxxas de alta potencia | Moderado | Robusto, patentado |
Para más información, consulte Visión general de Horizon Hobby 2025 o Guía ilustrada de Ufine Battery.
Consejo profesional: Los conectores de la serie XT (Amass) dominan por su combinación de capacidad de corriente, facilidad de uso y amplia disponibilidad. Los conectores de la serie Deans y EC siguen utilizándose en configuraciones heredadas o por sus ventajas antichispas.
Guía paso a paso: Cómo elegir el conector adecuado para su modelo de RC
1. Calcule sus necesidades máximas de corriente
- Averigua la corriente continua máxima de tu ESC o motor.
- Añadir al menos 20% de margen de seguridad (por ejemplo, ESC de 40A → elija un conector clasificado para 48A+).
- Utiliza una fórmula rápida:
Amperios máximos del motor × 1,2 = Capacidad mínima del conector
¿Por qué? Los conectores subdimensionados se sobrecalientan, provocan caídas de tensión y pueden fundirse bajo carga. Una vez perdí una carrera porque mi conector se fundió literalmente en el despegue.
2. Adapte el conector a su aplicación de RC
- Micro drones/nano RCs: Ir con JST o XT30
- Pilotos FPV/5" drones/coches pequeños: XT30 o XT60
- Coches RC 1/10/cuadriciclos medios/aviones a escala: XT60, Deans, EC3
- Camiones, aviones grandes, barcos: XT90, EC5/EC8, a veces TRX
Ejemplos de escenarios:
- Para un ligero 4S 5″ FPV quad dibujo 40A: XT60 es ideal.
- ¿Construyendo un camión de 1/8? XT90 o EC5 para manejar los amperios y la tensión.
- Antiguo coche RC, ¿vino con Deans? Quédate con él a menos que estés estandarizando la flota.
3. Comprobación del ajuste mecánico y de la instalación
- ¿Encajará el conector en el compartimento de la batería o en el cuadro?
- ¿Hay suficiente espacio físico para enchufar y desenchufar fácilmente?
- ¿Tienes un buen soldador y el calibre de cable adecuado?
Conector y guía de cables:
| Conector | Calibre de cable admitido |
|---|---|
| XT30 | 20-26 AWG |
| XT60 | 12-18 AWG |
| XT90 | 10-14 AWG |
Si no está seguro, "ajuste en seco" un conector y los cables antes de soldar.
4. Evaluar el coste y la disponibilidad
- Limítese a las grandes marcas (Amass, Traxxas, EC) y evitar las imitaciones.
- ¡Cuidado con los conectores falsos! Estos a menudo se sobrecalientan o se derriten -dolor aprendido de la manera difícil (y humeante).
- Normalizar los conectores en todos sus modelos si es posible, para facilitar el uso compartido de la batería.
5. Priorizar la seguridad y la polaridad
- Compruebe la orientación de los cables siempre. Muchos conectores no están protegidos contra polarización.
- Utilice termorretráctil y alivio de tensión por cada unión soldada.
- Pruebe siempre los conectores nuevos con un multímetro antes de enchufar una batería.
Lista de comprobación imprimible: El flujo de decisiones sobre el conector LiPo
- [ ] Identifique su requisito de corriente máxima (especificaciones del ESC/motor)
- [ ] Añadir al menos 20% de margen
- [ ] Aplicación de verificación cruzada (dron, coche, avión, barco)
- [ ] Confirme el calibre del cable y la compatibilidad del conector
- [ ] Garantizar el ajuste mecánico/espacial
- [ ] Elija un conector de marca original (no falsificaciones)
- [ ] Planifique sus herramientas de soldadura/instalación
- [Prueba de polaridad antes del primer uso
- [ ] Normalizar cuando sea posible
Guarde o imprima esta lista para consultarla el día de la construcción.
Instalación del conector: Guía práctica
Herramientas que necesitarás:
- Soldador (40W+ recomendado)
- Soldadura (núcleo de colofonia, 60/40 o sin plomo)
- Flux
- Pelacables
- Tubo termorretráctil
- Multímetro
- Paciencia (sobre todo la primera vez)
Paso a paso:
- Prepárate:
- Monte todos los engranajes, elija el conector y el calibre de cable correctos.
- Listón y estaño:
- Pele ~4mm de aislamiento. Retuerza/estañe las puntas de los cables y las lengüetas de los conectores.
- Soldador:
- Coloque el cable estañado en el conector estañado, aplique calor/soldadura. Evite las uniones frías.
- Compruebe dos veces la polaridad:
- "El rojo va a +, el negro a -" (verifícalo siempre, ¡hasta los profesionales se equivocan!).
- Deslice el termorretráctil:
- Cubra inmediatamente las juntas; utilice una pistola de calor para un ajuste seguro.
- Prueba:
- Utilice un multímetro para comprobar la continuidad y la polaridad correcta.
- Primer potenciador:
- Encienda con la carga más baja y controle el calor/conexión.
Tiempo estimado: 15-30 minutos para principiantes, 5-10 minutos para veteranos. Vea este vídeo detallado (FliteTest).
Errores de instalación:
- Soldadura fría (juntas sin brillo y granuladas)
- Inversión de polaridad (catastrófica, ¡prueba siempre!)
- Saltarse el termorretráctil (riesgo de cortocircuitos)
- Conector fundido por soldadura prolongada
Si no está seguro, practique primero con cables y conectores de repuesto: es una habilidad que mejora rápidamente.
Solución de problemas y arreglos: Problemas comunes de los conectores LiPo
1. Sobrecalentamiento del conector
- Síntomas: El plástico se ablanda, el enchufe se calienta, decoloración
- Arréglalo: Cambia a un conector de mayor capacidad o suelda de nuevo para mejorar el contacto.
2. Ajuste flojo o inestable
- Síntomas: Encendido intermitente, tartamudeo, reinicio del dispositivo
- Arréglalo: Sustituye el conector (no intentes "crimparlo" con unos alicates)
3. Polaridad cruzada o cableado incorrecto
- Síntomas: Chispas, componentes electrónicos fritos, el dispositivo no se enciende
- Arréglalo: Retire la batería, inspeccione inmediatamente, vuelva a soldar correctamente. Pruebe antes de volver a conectar.
4. Caídas de tensión o caídas de tensión misteriosas
- Síntomas: Ralentizaciones inesperadas, avisos de telemetría
- Arréglalo: Compruebe las soldaduras y el calibre de los cables; sustituya los conectores si es necesario.
5. Fallas de conectores falsos/de baja calidad
- Síntomas: Desgaste prematuro, fusión a amperios bajos
- Arréglalo: Adquiera pilas de marcas reputadas; evite los "extras incluidos" de proveedores dudosos.
Inspeccione siempre con regularidad los conectores en busca de signos de desgaste, picaduras o corrosión, especialmente en vehículos de uso al aire libre y de alto ciclaje.
Buenas prácticas profesionales y consejos reales
- Minimizar la resistencia: Mantenga los cables cortos, las soldaduras limpias y utilice conectores nuevos.
- Alivio de tensión: Utilice siempre termorretráctil y cables de soporte para evitar que se flexionen en la unión soldada.
- Polaridad de la etiqueta: Utilice retractilado o cinta adhesiva de color para una identificación +/- instantánea
- Evita las cadenas de adaptadores: Más conectores = más resistencia y eslabones sucesivamente más débiles
- Resistente a la intemperie: Para barcos/entornos húmedos, utilice grasa dieléctrica y compruebe si hay corrosión
- Precaución de falsificación: Inspeccione atentamente las marcas y la calidad de las clavijas (guía detallada aquí)
- Normalización de la flota: ¿Tienes varios modelos? Intente unificarlos en un único tipo de conector (XT60 o EC5 son los más populares) para ahorrar tiempo y dinero.
- Intercambios frecuentes: Si cambia las pilas/los conectores con frecuencia, compruebe cada mes si los conectores presentan signos de desgaste.
Recursos adicionales
- Información sobre conectores LiPo - Vibms
- Cómo elegir el tipo de enchufe adecuado para la batería LiPo - Ufine Battery
- Conectores de batería RC 101 - Oscar Liang
Si tienes algún problema o quieres más tutoriales del mundo real, consulta la página Prueba de vuelo biblioteca de vídeos sobre soldadura de conectores y resolución de problemas.
Ánimo final: ¡Prueba, vuela, diviértete!
Te lo dice un compañero adicto al RC: dedicar un poco más de tiempo a elegir e instalar el conector LiPo adecuado te ahorrará incontables dolores de cabeza, cables quemados y sesiones de vuelo perdidas. Tome todas las medidas de seguridad, vuelva a comprobar su trabajo, y obtendrá lo mejor de sus aventuras RC.
¿Tiene alguna pregunta o algún consejo que compartir? Deja un comentario a continuación: ¡la comunidad está aquí para ayudarte!