

If you want faster charges without sacrificing battery health (or safety), the charging rate you choose is the single most important setting. This guide shows you exactly how to calculate a safe current from capacity, set up a CC–CV charger correctly, verify temperature and per‑cell voltage, and decide when it’s appropriate to go faster.
- Difficulty: Intermediate (you’ll do quick math and read charger displays)
- Time to complete: 15–30 minutes for setup; 1.5–3 hours typical per charge cycle depending on rate and taper
- What you’ll achieve: A repeatable method to pick the right C‑rate, configure your charger, and confirm the charge is proceeding safely
Why this method works: Lithium‑ion polymer (LiPo) cells are designed to charge with a constant‑current then constant‑voltage profile (CC–CV). Keeping within the proper per‑cell voltage limits and temperature window is fundamental to performance and safety, as explained in the 2023 updates to Battery University’s overview of CC–CV and limits in BU‑409: Charging Lithium‑ion.
Before you start: What you need
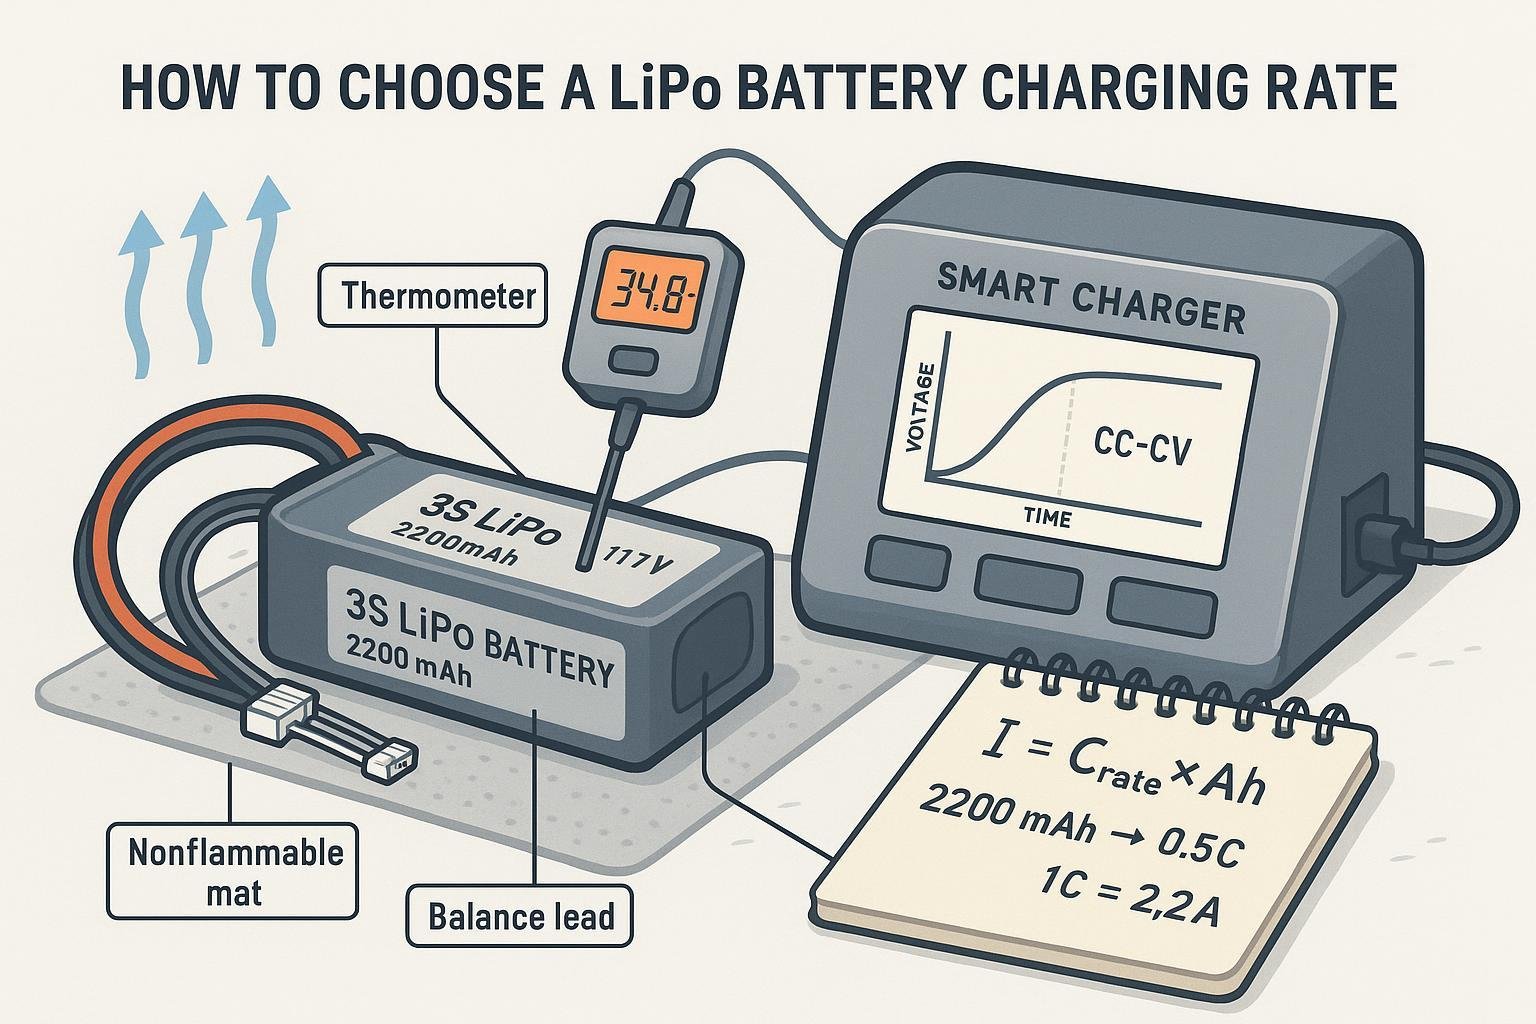
- A charger that supports Li‑ion CC–CV and, for series packs, balance charging via the balance lead
- Your battery’s capacity and datasheet (or label), including chemistry and allowed charge rate
- A way to monitor temperature (built‑in NTC on pack/charger or an external probe)
- A multimeter (optional but helpful) and, if available, an internal resistance meter
- A nonflammable, ventilated charging area (ceramic tile, metal tray, or a fire‑resistant charging bag/box)
You’ll reference these authoritative guides while you work:
- CC–CV profile, per‑cell voltage limits, and typical rates in Battery University’s 2023 write‑ups: Charging Lithium‑ion (BU‑409) y Charging at High and Low Temperatures (BU‑410).
- Termination current and charger behavior from Texas Instruments’ applications articles and datasheets, such as the 2022 TI Analog Applications Journal note on termination current accuracy SLYT842 and the classical TI primer SLAA287.
Tooling note: If you routinely specify or procure packs, suppliers like Yungbang Power can provide cell/pack datasheets and charge‑rate guidance for custom designs. Disclosure: Yungbang Power is our product.
Step 1 — Confirm your battery specs and limits
Identify the following from the label or datasheet:
- Rated capacity in mAh or Ah
- Chemistry and per‑cell voltage limit
- Series/parallel configuration (e.g., 3S1P, 4S2P)
- Recommended and maximum charge rates
- Allowed charge temperature range
Key per‑cell voltage limits by chemistry (always defer to the datasheet):
- Standard Li‑ion/Polymer: max 4.20 V per cell. See Battery University’s 2023 overview in BU‑409: Charging Lithium‑ion.
- Li‑ion High Voltage (LiHV): often 4.35–4.40 V per cell; only apply if your specific cell is rated for it. This variant is referenced in the 2023 BU‑409 overview of higher‑voltage chemistries.
- LiFePO4: 3.60–3.65 V per cell. See the chemistry‑specific discussion in Battery University’s 2023 article BU‑409b: Charging Lithium Iron Phosphate.
Pro tip: For multi‑cell series packs (e.g., 3S, 4S), plan to use balance charging regularly; it helps keep cells aligned and avoids over‑voltage on a weak cell as explained in TI and BMS vendor materials like the 2022 TI BQ769x2 application note SLUAA81.
Step 2 — Compute your candidate charge currents (0.5C and 1C)
Use the C‑rate formula:
I_charge (A) = C_rate × Capacity (Ah)
Quick examples:
- 1000 mAh (1.0 Ah): 0.5C → 0.5 A; 1C → 1.0 A
- 2200 mAh (2.2 Ah): 0.5C → 1.1 A; 1C → 2.2 A
- 5000 mAh (5.0 Ah): 0.5C → 2.5 A; 1C → 5.0 A
These calculations follow the definition of C‑rate summarized in Battery University’s 2023 refresher, BU‑402: What is C‑Rate?
Default guidance if your datasheet is unclear:
- Start at 0.5C to 1C for standard Li‑ion unless the datasheet states otherwise; this aligns with practical recommendations in the 2023 update to BU‑409: Charging Lithium‑ion.
Step 3 — Check environment and temperature limits
Charging temperature strongly affects safety and longevity.
- Stay within roughly 0°C to 45°C during charging; below 0°C, lithium plating risk increases, and above 45°C, degradation accelerates. Battery University’s 2023 guidance in BU‑410: Charging at High and Low Temperatures explains both risks.
- For longevity, prefer 10–30°C when possible.
- If the pack approaches 45°C during charging, reduce current or pause to cool.
If you must charge in challenging conditions:
- Near 0–10°C: Derate to 0.5C or lower unless your datasheet allows cold‑charge profiles with safeguards; many charger ICs implement JEITA‑like temperature rules to reduce/suspend charging outside safe windows, as described in TI’s 2021 BQ25170 datasheet BQ25170.
- At ≥35–40°C ambient or in poor airflow: Reduce current 25–50% and improve ventilation.
Step 4 — Configure your CC–CV charger (and balance leads)
Set three essentials correctly:
- Per‑cell voltage limit
- Standard Li‑ion: 4.20 V/cell
- LiHV: Only set 4.35–4.40 V/cell if the cell and charger explicitly support it
- LiFePO4: 3.60–3.65 V/cell
- For rationale and values, see the 2023 chemistry guidance in BU‑409 y BU‑409b.
- Charge current (C‑rate)
- Program the current you computed in Step 2 (e.g., 0.5C–1C) unless your datasheet specifies a different maximum.
- Termination current (ITERM)
- Set ITERM to about 3–10% of capacity (0.03C–0.10C). Lower values yield slightly more stored capacity with longer taper; higher values shorten the session but leave a bit less capacity. See TI’s 2022 note on termination accuracy SLYT842 and the TI fundamentals brief SLAA287. Analog Devices’ LTC4054 datasheet also illustrates CC–CV taper and termination behavior in small chargers: LTC4054.
Balance charging for series packs
- Always connect the balance lead on multi‑cell series packs. BMS and charger references emphasize balance to prevent any one cell from exceeding its limit during CV; see TI’s 2022 BQ769x2 app note SLUAA81.
Important: Do not enable float or trickle on Li‑ion. Terminate when current tapers to ITERM. This is reiterated in Battery University’s 2023 explainer BU‑401: How do Battery Chargers Work? and the 2023 CC–CV overview BU‑409.
Step 5 — Start the charge and verify key checkpoints
Use these pass/fail checks as the session progresses:
- CC phase: The charger should deliver the programmed current (e.g., 2.2 A at 1C for a 2200 mAh pack). The pack should remain within the allowed temperature window and feel only mildly warm at most.
- Transition to CV: As per‑cell voltage reaches the limit (e.g., 4.20 V/cell), the charger should hold that voltage and current will begin to taper.
- Termination: The charger should stop when current tapers to ITERM (e.g., 0.05C). Battery University’s 2023 summary in BU‑409 describes this taper‑then‑terminate behavior.
- Balance check (series packs): After the pack rests for about 30–60 minutes, verify per‑cell voltages are within roughly 10–20 mV. Persistently larger gaps (e.g., >20–30 mV) suggest growing imbalance or aging. TI BMS references show balance activation thresholds around 30–40 mV, for example the 2020 BQ29209‑Q1 datasheet BQ29209‑Q1 and a 2022 16‑cell reference design TIDUF14.
If a checkpoint fails: Stop, investigate, and reduce current or service/retire the pack as needed. See Troubleshooting below.
Step 6 — Decide if you can go faster
Use this framework before increasing above 1C:
- Datasheet permission: Only increase if the cell/pack datasheet explicitly allows a higher fast‑charge rate.
- Thermal headroom: In your current setup, the pack stays comfortably below ~45°C. If not, do not increase current. TI charger datasheets typically regulate or suspend outside safe windows, but you should still set conservative limits; see the 2021 BQ25170 description of temperature handling BQ25170.
- Pack condition: Older packs with higher internal resistance tend to heat more. Derate rather than increase.
If any of these are uncertain, keep 0.5C–1C. It’s a balanced choice for speed and health, consistent with the practical ranges discussed in the 2023 BU‑409 overview.
Step 7 — Post‑charge health check and logging
After the pack cools to ambient:
- Verify per‑cell delta (series packs) is within about 10–20 mV at rest. If it stays above 20–30 mV over multiple cycles, increase balance frequency or consider retiring the pack. This target aligns with common BMS thresholds from TI’s documentation BQ29209‑Q1 y TIDUF14.
- Note any swelling, odor, or abnormal warmth; if present, discontinue use. Safety concerns and swelling alerts are highlighted in the 2023 BU‑409: Charging Lithium‑ion.
- Log charge time, programmed current, pack temperature, and any observations. Over time, rising internal resistance and shorter runtime indicate aging; Battery University’s 2023 note on lifecycle defines practical end‑of‑life around 70–80% of original capacity in BU‑801b: How to Define Battery Life.
Quick reference: Current and typical time
| Rated Capacity | 0.5C Current | 1C Current | Typical Full Charge Time (CC–CV) |
|---|---|---|---|
| 1000 mAh | 0.5 A | 1.0 A | ~1.8–3.0 h |
| 2200 mAh | 1.1 A | 2.2 A | ~1.7–2.8 h |
| 5000 mAh | 2.5 A | 5.0 A | ~1.7–2.7 h |
Notas:
- Time varies with ITERM setting and balance activity. Even at 1C, the CV taper extends total time beyond the nominal 1 hour, as explained in the 2023 CC–CV overview BU‑409.
Derating rules of thumb
Use these conservative adjustments when conditions aren’t ideal:
- Ambient below 10°C: Cap current at 0.5C (or lower if pack warms slowly); never charge below 0°C unless a datasheet prescribes a controlled cold‑charge method, per 2023 guidance in BU‑410.
- Ambient ≥35–40°C or poor airflow: Reduce current by 25–50% and improve cooling.
- Aged/high‑IR pack: Start at 0.5C; monitor temperature closely; only increase if thermal headroom is clear.
Troubleshooting: If something looks or feels wrong
Pack gets hot (approaching ~45°C) during CC
- Actions: Pause, cool, then resume at a lower C‑rate; improve airflow. Persistent heat suggests high internal resistance or over‑ambitious current. The 2023 temperature guidance in BU‑410 explains why heat is a risk.
One cell reaches voltage limit early (series packs)
- Actions: Ensure balance lead connection; switch to balance charge; reduce current. If post‑charge delta stays >20–30 mV, the pack is drifting. TI materials show BMS balance thresholds around 30–40 mV (e.g., 2020 BQ29209‑Q1 and 2022 TIDUF14). Consider retiring if imbalance persists or worsens.
Pack swells, smells sweet/solvent‑like, or vents
- Actions: Stop immediately; move the pack to a fire‑safe area; do not puncture; retire the pack safely. Battery University’s 2023 charge safety notes in BU‑409 caution against continuing use after swelling.
Charge never completes (stuck in CV)
- Checks: Is ITERM set very low (e.g., 0.03C)? That can extend taper time significantly. Consider a moderate ITERM within the 3–10% band, per TI’s 2022 discussion in SLYT842. Confirm per‑cell balance; a severely weak cell can prolong CV.
Charger reports error or suspends
- Checks: Many modern chargers follow JEITA‑style temperature rules and may reduce current or suspend outside safe ranges; see TI’s 2021 BQ25170 behavior BQ25170. Verify sensor placement, ambient temperature, and pack NTC connectivity.
FAQs
Do I need to balance charge every time for a 3S/4S pack?
- Best practice is yes or at regular intervals, especially as packs age. Keeping cells aligned reduces the chance of a single cell exceeding its limit under CV, a point echoed in TI’s 2022 BQ769x2 guidance SLUAA81.
Can I charge LiHV packs to 4.35–4.40 V per cell on any charger?
- Only if the specific cell is rated LiHV and your charger supports that voltage. Do not apply LiHV voltages to standard cells. The 2023 chemistry overview in BU‑409 notes these higher‑voltage variants.
What’s different for LiFePO4?
- Use a 3.60–3.65 V/cell limit and follow the LiFePO4‑specific recommendations summarized in Battery University’s 2023 BU‑409b. Many chargers have a dedicated LiFe mode—use it.
Can I parallel‑charge multiple packs?
- Parallel charging concentrates risk and requires matched state of charge, chemistry, and similar internal resistance. This guide does not cover parallel charging procedures. If you do it, use purpose‑built boards and conservative currents, and monitor temperature closely.
How long should a full charge take at 1C?
- Often around 1.7–2.8 hours due to the CV taper finishing phase, not a flat 1 hour. See the 2023 CC–CV timing explanation in BU‑409.
Should I float or trickle a LiPo when full?
Next steps
- Keep your datasheets handy and annotate them with your chosen current, voltage, and ITERM settings.
- Periodically log charge time, temperature, and post‑charge balance. If thermal headroom shrinks or imbalance grows, derate.
- When in doubt, choose the conservative path—0.5C within a 10–30°C environment, balance connected, and termination set correctly is a robust default backed by the 2023 guidance in Battery University’s charging series and TI’s charger documentation.